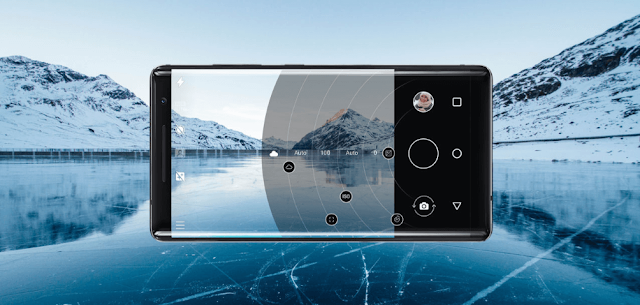
Nokia smartphones come with a very useful feature which can help you take some incredible photos if you know how to use it. I am referring the Pro Mode in the Nokia camera app. This feature was introduced by Nokia on their Lumia smartphones and completely changed smartphone photography. Due to popular demand, Pro Mode was reintroduced with the Nokia 8 Sirocco and Nokia 7 plus back in 2018.
A lot of you out there like to capture photos on your Nokia smartphones and show it to the world. There are many of you who make good use of the Pro Mode but at the same time, there are many who want to know and understand what these sliders do and what settings to use while capturing in the Pro Mode. In this post, I’ll try to explain about every Pro Setting and what it does and how you can use them in various situations.
A lot of you out there like to capture photos on your Nokia smartphones and show it to the world. There are many of you who make good use of the Pro Mode but at the same time, there are many who want to know and understand what these sliders do and what settings to use while capturing in the Pro Mode. In this post, I’ll try to explain about every Pro Setting and what it does and how you can use them in various situations.
Before I start I would like to add that I am not a pro photographer but just know basics about these Pro Settings after using them for many years on my Lumia. So, let’s begin. :)
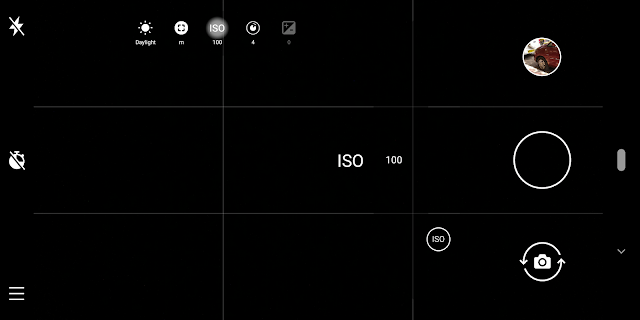
What you see above is the Pro Mode and I’ll go through all the settings starting from right slider going to the left.
1. Exposure Value (Brightness)
The first slider to the right is to set the Exposure Value (EV) or Exposure Compensation. This setting helps you to control the brightness of the scene you are capturing. You can make the shot look brighter or darker by increasing or decreasing the Exposure Value. Nokia smartphones can set exposure values between -2 and +2. Here's a quick example of an image shot in the same lighting condition but with different exposure values. I have mentioned the exposure value used for every image in their caption.
 |
| Exposure Value +2 |
 |
| Exposure Value +1 |
 |
| Exposure Value 0 |
 |
| Exposure Value -1 |
 |
| Exposure Value -2 |
2. Shutter Speed
Shutter Speed means how long a camera shutter remains open to collect light. Faster/Shorter shutter speeds allow you to click images of fast-moving objects but require a good amount of light. Slower/Longer shutter speeds allow you to click bright images even in low light but you will require a stable surface or a tripod to prevent from getting shaky images.
Shutter Speed values on Nokia Camera app range between 1/500 – 4 seconds. The faster shutter speed values on current Nokia smartphones are very limiting when we compare them even to the Lumias of the past but you can use some 3rd party apps like the Adobe Lightroom CC which has more fast shutter speed options compared to the stock camera app.
Check out these amazing low light images captured by Anthony Hunter on his Nokia 9 PureView using the manual shutter speed option.
Tried some night shots this evening.— Anthony Hunter (@anthonyhunter69) March 24, 2019
Good quality I think 🙂
More to come 😉@nokia @NokiaMobile @HMDGlobal @hmd_global @NokiamobBlog #nokia9 #nokia #photography #pureview #phoneography #nature @pickit #sweden #mobilephotography #sverige #color #5lenses #fivelenses #nokialove pic.twitter.com/iGBpkwa7Y9
3. ISO (Sensitivity)
For Example: With higher ISO values and Faster shutter speeds you can freeze a fast moving object in your frame. With lower ISO values and Slower shutter speeds, you can capture amazing light trails or low light shots of non-moving subjects or the night sky. ISO Values differ from device to device and the Nokia Camera app on Nokia 7 plus has ISO values ranging between ISO100 - ISO3200. Some 3rd Party apps also have an option of setting ISO at 50.
Here are some images of the same object shot at different ISO levels in the same lighting conditions. To show the effect of the ISO I have set the Shutter Speed to 1/30.
 |
| ISO 3200 |
 |
| ISO 1600 |
 |
| ISO 800 |
 |
| ISO 400 |
 |
| ISO 200 |
 |
| ISO 100 |
As you can see in these images, Higher ISO will give you brighter images but as the ISO increases so does the noise in the images. The images with higher ISO also lack details and look washed out. So, you need to balance the ISO and Shutter speeds depending upon the lighting conditions around you.
4. Manual Focus:
Don't you love those striking close-up photos of objects? This setting takes you from Macro focus at the bottom of the slider moving to Infinity focus at the top and can give your images a very beautiful look along with a natural blur. You have full control over what subjects you want to keep in focus and what not. You can set the Focus to Infinity while clicking far away subjects like a moon to quickly capture the images without having to wait for the camera to focus while in Auto mode. Manual Focus can be very useful if you love Macro photography as it creates that natural blurred background and adds a sense of depth to the images.
Here's a quick demo of how Manual focus works. 🙂
5. White Balance
White Balance helps the camera to understand and reproduce the colours in your photos depending on different lighting conditions. You can change the White Balance and make sure that the colours in the Viewfinder are exactly the same as you see them in real life. For example, If you are shooting a White sheet of paper it should appear as White in different lighting conditions. White Balance helps the camera to reproduce that white colour and show it to you in the Viewfinder. If it doesn’t match the real colour you can use the slider and find the exact match. If you are capturing a sunset it would enhance the image if you go with a warmer White Balance.
You can also play with the White Balance and give your images a creative look. There’s nothing wrong or right about the white balance you select. It’s just what your creative eyes see. ☺
Below are some images of Hotel Taj Palace which I have clicked using different White Balance options.
This was quick information about the Pro Settings of the Nokia Camera app. Now that you know the basics about the ProMode, I hope you will use it the next time you fire up the camera. We would love to see your images shot on Nokia smartphones using the Pro Mode. So, do tag us and also use the hashtag #ProModeOnNokia while sharing images you have shot using the ProMode.
Also, keep on experimenting with different settings in the Pro Mode and take the camera controls in your hand. This will help you in better understanding the Pro Mode. If you have any doubts feel free to ask them in the comments below. :)


Comments
Post a Comment